A bowl of kitchen ingredients can create more than just meals; it can give you natural face masks that target your skin’s needs, all while keeping things simple. Small lifestyle shifts, like using these masks, make skincare easy and sustainable without reliance on shop-bought solutions.
Trying DIY natural face masks connects you directly to what you apply to your skin—leading to more mindful grooming skills and quick, enjoyable care habits. With common kitchen ingredients, your routine becomes personalized and practical, making every minute count.
Discover the micro lifestyle skills behind quick natural face masks, refine your daily rituals, and enjoy visible changes. Let’s break down straightforward routines, actionable tips, and ingredient insights to help you glow with minimal effort.
Build a Custom Routine Using Natural Face Masks With Just Five Steps
Anyone can make natural face masks fit their personal schedule by choosing ingredients, following precise prep, and noticing real benefits. It’s not about time—it’s about tweaks that add up, especially when masks slip into your morning or night routine.
Think of natural face masks like making tea: measure, mix, apply, and let it steep. These five steps form a mini procedure you can use with oats one day and honey the next, always tuned to today’s needs.
Essential Kitchen Ingredients: A Starter Checklist
Oats act as gentle exfoliants and are suitable for sensitive skin. Honey brings moisture and can help skin appear brighter. Avocado provides nourishing fats to support the skin barrier, while yogurt naturally soothes and renews tired complexions with its lactic acid.
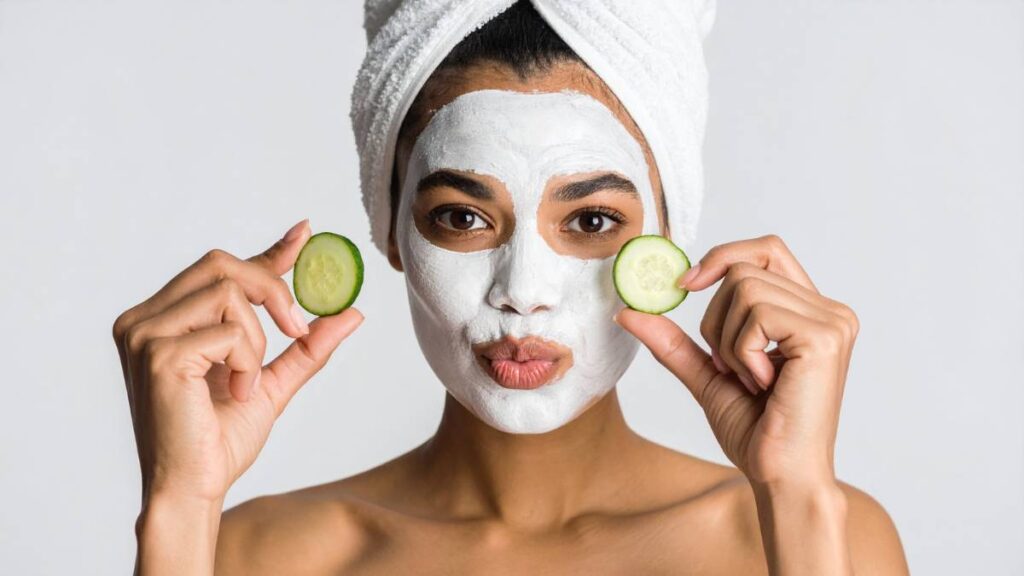
Cucumbers cool the skin and may help with puffiness, especially under the eyes or in high-humidity months. Egg whites add temporary firmness, making them a natural tightening mask for special events or post-travel care.
When selecting, stick to single-ingredient, unprocessed foods. Scan for expiration dates and freshness—never use items you wouldn’t eat. This checklist gives you the flexibility to adapt masks in seconds using pantry standbys.
Application Micro-Habits: Building Consistency and Comfort
Create a habit by prepping your mask while brewing coffee or tea so that application becomes linked to another daily cue. Apply with clean hands or a brush, using gentle upward strokes for even coverage.
Set a five-minute timer and spend the time with your eyes closed, letting your mind rest or catching up on music. Wipe off your mask with a soft, damp towel and finish with a simple moisturizer or day cream.
Repeat these small rituals twice weekly, noting how your skin feels before and after. Use a notebook or phone reminder to cement your new sequence, turning it into a refreshing micro lifestyle skill.
| Ingredient | Skin Benefit | When To Use | Quick Tip |
|---|---|---|---|
| Oats | Gentle exfoliation | Weekly, for dry/itchy patches | Blend finely for a smoother paste |
| Honey | Hydration and glow | Any time skin looks dull | Mix with yogurt for combo skin |
| Avocado | Repair and nourish | Cold months, after sun | Add olive oil for extra softness |
| Cucumber | Soothes puffiness | Mornings or after workouts | Apply chilled slices under eyes |
| Egg White | Tightens/tones | Before big events | Whisk for a fluffy texture |
Maximize Results by Pairing Masks With Simple Prep Tricks
Masks work better when you prep your skin correctly—think of it like priming a wall before painting, making everything smoother and more effective. Clean skin helps natural face masks stick and deliver nutrients where they’re needed.
Gently removing dirt or oil with lukewarm water and a mild cleanse ensures no residue blocks the mask. It’s a small, two-minute step with outsized benefits on absorption, texture, and comfort.
Exfoliation Before Masks for Softer Results
Use a damp washcloth or a half-teaspoon of ground oats mixed with water for manual exfoliation. This buffs away dead cells without harshness and sets up your skin for full mask benefits. Move fingers in small circles, covering all facial areas.
- Rinse with lukewarm water only; skip hot temperatures to avoid redness and discomfort.
- Pat dry with a soft, clean towel, pressing gently rather than rubbing to keep skin comfortable.
- Use natural face masks within three minutes of exfoliating for maximum absorption and quick results.
- Always check for sensitivity—do a patch test behind the ear if trying a new combination for the first time.
- If the skin tingles or feels uncomfortable, rinse off quickly and choose a simpler mask instead.
Adding a drop of oil or a splash of rosewater after the mask can lock in hydration, just like sealing in a stamp with a protective cover. This small move keeps skin smoother longer.
Small Tweaks for Sensitive or Reactive Skin
If your skin responds unpredictably, stick with ultra-simple combos: oats and a few drops of water or yogurt mixed with a bit of honey. Leave masks set for just five minutes to minimize risk.
- Start with single ingredients and introduce blends over several sessions for better tracking of reactions.
- Mash ingredients into fine pastes—chunky textures irritate sensitive skin or may clog pores.
- If redness appears, cool down with cucumber slices and gentle patting motions before applying moisturizer.
- Plan your mask routine during quieter periods—avoid pre-event testing to reduce unwanted surprises.
- Record ingredient combos and timing in a small journal to spot trends and shape your routine confidently.
Prioritize comfort: if an ingredient feels too intense, swap for another. Micro lifestyle skills in skincare focus on observation and adaptation.
Quick-Blend Masks for Mornings, Nights, and Special Occasions
Making natural face masks for different parts of your week works like meal prepping—mix up several options based on what’s ahead. Each recipe fits a specific situation, helping you act fast and effectively.
Morning: Blend yogurt, honey, and a pinch of turmeric to refresh tired skin and prep for makeup. Evening: Go with mashed banana and avocado for intensive repair after sun or stress. These combinations turn basic kitchen time into targeted self-care.
Seasonal Tweaks: Mask Variations for Weather Shifts
During cold snaps, try olive oil and oatmeal blended with warm water to keep skin calm and resilient. On humid days, lighten up—use cucumber puree and egg white for cooling and tightening.
If pollen is high or skin seems extra sensitive from the environment, skip citrus and extra-active ingredients. Rely instead on finely mashed oats and cold yogurt to combat redness and restore balance without irritation.
For those travel-heavy weeks, keep small sachets of dry oatmeal and powdered honey handy. When you land, add water to revive a mask—quick application, quick clean-up, no extra mess.
Efficient Storage and On-the-Go Use
Any leftover mask mix can be portioned into clean ice-cube trays. Pop out a cube, thaw, and use whenever skin needs an instant pick-me-up. This is a practical micro-skill for busy mornings.
Cotton pads pre-soaked in cucumber or green tea water make rapid under-eye treatments. Store them in a small container in the refrigerator and apply them directly during makeup routines or busy midday breaks.
If you’re a parent, involve kids in making masks as a fun bonding activity. Let them mash bananas or stir yogurt, making healthy habits a shared experience—plus, clean-up usually becomes easier this way.
Staying Flexible: Adapting Mask Recipes to Your Needs
Natural face masks adapt to changing needs. Adjust ingredients to suit weekly skin shifts—oily after workouts, dry in heated rooms, or red after extra sun. Just as you season food to taste, tweak your mask for today’s concern.
Blend new ingredients slowly into existing favorites. Swap out avocado for pureed pumpkin if you’re out, or try apple-cider vinegar in small amounts to brighten dull complexions. Think—one change at a time to better track results.
Incorporate Fresh Add-ins for Extra Benefits
Crumbled chamomile tea or matcha give masks extra calming or antioxidant properties. Stir a pinch in with oats or yogurt and see how your skin feels after just one use.
Coffee grounds can add texture for gentle exfoliation, while aloe vera soothes after wind or sun. Add these to your rotation especially after days spent outdoors or if your skin feels rougher than usual.
Check your kitchen weekly: as ingredients get close to expiration, prioritize them for your mask. This reduces food waste and supports mindful self-care—try the same with herbs like mint and basil for a fragrant twist.
Responding to Routine Challenges
Unexpected breakouts or irritation can happen with any new ingredient. Pause all masks for several days and use plain yogurt alone until skin calms down. Afterward, reintroduce one tweak at a time, observing each mini change.
If a mask feels tight or itchy mid-use, rinse off, apply a basic unscented moisturizer, and avoid acids or exfoliants for 24 hours. Adapt your next round: favor gentler combos for stress or allergy flares.
Micro lifestyle skills in skincare mean checking in with your skin daily. Adopt new blends when your skin shows signs of readiness, or return to basics if needed. Consistency and small shifts matter most over time.
Minimalist Masking: Keep Your Process Clean and Safe
Natural face masks work best when tools are clean and methods are simple. Scrub all bowls and brushes with hot water and soap before starting—a five-minute clean-up means fewer breakouts and longer-lasting supplies.
Wash hands before and after making masks. Keep a dedicated face towel separate from shower or workout towels. This separation avoids cross-contamination and keeps skin clearer between routines.
- Always discard any unused mask portion after 24 hours unless refrigerated.
- Use glass or ceramic bowls for mixing; plastic can retain scents and bacteria.
- Label mini containers with dates if prepping multiple mixes for a week—track freshness, just like meal prep.
- Store avocado or banana-based masks in the fridge and use them the same day for peak potency.
- Mist skin lightly with water before applying thicker blends; this boosts spreadability and comfort, especially in the drier months.
Refine your skills as you notice which routines deliver smoother, brighter skin. Small, neat habits add up to visible improvements in under a week.
Make Your Routine Social: Share, Gift, and Celebrate DIY Masks
Sharing natural face masks transforms a solitary act into a group ritual—host a virtual mask mixer or invite friends for a casual self-care afternoon. Everyone can bring their favorite kitchen ingredient, sparking interesting blend ideas.
Pick a relaxing playlist, set up bowls, and compare results after. This practice links self-care with social bonding, making micro lifestyle skills feel even more rewarding and memorable.
Gift-Worthy Mask Kits for Friends and Family
Bundle sample jars with oats, honey, and small instruction cards as thoughtful gifts for birthdays or holidays. Add a wooden spoon or soft applicator—encourage safe experimentation and comfortable masking at home.
Wrap up these kits in reusable fabric bags or small boxes, making the process eco-friendly and extra personal. Share simple backup recipes so recipients can customize to their skin at any time.
Building group habits around natural face masks strengthens routines. Swap feedback or trade successful blends, making self-care a creative and consistent part of everyone’s week.
Celebrating Micro Wins With Regular Reflection
Track progress by snapping weekly photos or keeping notes about your skin’s tone and smoothness after each mask. Share highlights with friends or online groups for shared encouragement and accountability.
Reflect together on which masks worked best for dry spells, breakouts, or seasonal changes. Group reflection clarifies preferences, encourages tweaks, and boosts confidence in everyday care skills.
Follow a monthly review ritual: set goals for new mixes or habits. Over time, this transforms masking from a task into a gratitude practice and a micro-celebration of small, visible shifts.
Micro Lifestyle Skills With Natural Face Masks Elevate Self-Care
Small steps with DIY natural face masks add up to significant care. Using kitchen ingredients gives you control, saves time, and shrinks your routine without losing effectiveness. The process fits a micro lifestyle approach perfectly—quick, adaptable, and satisfying.
Making masking social or reflective creates positive feedback loops that anchor these skills into weekly life. Each adjustment fine-tunes results, and every ingredient swap keeps routines fresh, engaging, and purposeful.
End every masking session with a moment of gratitude for learning something new. Natural face masks, made and used this way, become a micro lifestyle skill that feels low-effort yet truly transformative for your skin and your mindset.
Frequently Asked Questions
Which kitchen ingredients are safest for first-time natural face masks users?
Oats and plain yogurt are gentle and suitable for almost every skin type. Try these first, apply for five minutes, and monitor for any discomfort or changes before experimenting further.
How regularly should you use natural face masks for visible results?
Applying natural face masks two to three times per week is ideal for most routines. Consistency helps you notice smoother texture and balanced tone without overwhelming your skin with too much change.
Are there any kitchen ingredients to always avoid in natural face masks?
Lemon juice, baking soda, and raw apple cider vinegar are too harsh for direct facial application. They can disrupt skin pH and cause redness, especially for sensitive or dry skin types.
What’s the best way to store leftover mask mixtures?
Refrigerate unused mask portions in clean, labeled containers, and use within 24 hours for freshness. Never store masks with raw egg or dairy for more than a day to prevent spoilage.
Can children participate in making natural face masks?
Children love hands-on projects like yogurt, mashed banana, or oat masks. Supervise their choices, avoid essential oils or spices, and make the activity a playful ritual for healthy, early skincare habits.