You notice a drawer packed with tangled earbuds and phone chargers. We all face this. Though a small detail, organizing cables can dramatically improve your home’s order and your daily workflow.
Cluttered cables mean wasted time, lost patience, and sometimes even broken devices. Arranging these cords isn’t glamorous, but it builds micro lifestyle skills that ripple through your routine. Organization habits free you up for things that matter.
Read on for practical, concrete strategies. Whether you’re tackling a home office, gaming nook, or nightstand mess, these methods for organizing cables will guide you toward less stress and more efficiency—right down to the smallest details.
Eliminating Cable Clutter at Its Source
The clearest route to a neater space is to put direct limits on cable chaos. Starting with fewer cables always makes organizing cables easier every single time you tidy up.
Most people keep stacks of unused cords “just in case.” Instead, immediately remove or recycle any cables attached to devices you no longer own, and group duplicates together for review every few months.
Establish a Culling Rule
Whenever you find a spare cable, check if it fits a device you still use. If it doesn’t, place it in an “outbox”. Once the box is full, recycle those items in a local e-waste bin.
This micro-process keeps your storage drawer lighter without endless decision fatigue. Instead of asking, “Could I need this in the future?” just reference your concrete rule every time you put cables away.
If you pause and ask, “Which device does this belong to?” before tossing a cable in the drawer, you’ll catch stray duplicates and eliminate future tangles without effort.
Audit Once a Month
Pick a recurring day—such as the first Saturday each month—to check your cable storage. Run through your outbox, storage pouches, and active workspaces. Remove unnecessary items while sorting by category.
Try stating your intent aloud, like, “I’m only keeping cables for devices I use weekly.” Speaking your plan works as a subtle mental prompt, and strengthens your organizing cables routine into a habit.
This 10-minute audit clears out legacy clutter, so you don’t wake up to a surprise mess months later. Audits ensure your progress sticks without a massive seasonal overhaul.
| Cable Type | Primary Use | Declutter Frequency | Action Step |
|---|---|---|---|
| USB charging cables | Phones/tablets | Quarterly | Keep one per active device; recycle old types |
| HDMI cables | TVs/monitors | Bi-annually | Label and tie; store extras in a bag |
| Power adapters | Laptops, speakers | Annually | Strip down to essentials, test before storage |
| Audio cables | Headphones/stereos | Quarterly | Wind neatly and keep near devices |
| Ethernet cables | Networking | Yearly | Wrap and store in a labeled shoebox |
Applying Practical Rules for Everyday Cable Management
Enforcing practical organizing cables ground rules keeps your cords contained. Use consistent, slot-based storage and choose a single strategy for each location you maintain—no improvising allowed.
Store cables as close as possible to where they’re actually needed. If you move a charger or extension cord regularly, set a station for it in each room. This reduces back-and-forth clutter.
Designate One Storage Type per Zone
Stash laptop adapters in a ziplock, earbud pouches on a hook, and HDMI cables in a labeled shoebox. This way, every cable returns home easily and you never have to search.
- Pick a visible, reachable location for daily-use cables, so they’re always tidy and never tangling at the bottom of a bag.
- Use clear containers for cables you rarely access—transparency means you’ll never have a “mystery” mess to untangle in a pinch.
- Always attach reusable cable ties before storing a cord away, making fast retrieval simple and preventing spaghetti-like mess later on.
- Keep heavier power cords flat in a drawer, laying them out in a fan or accordion fold for easy grab-and-go organization and a more visually calming effect.
- Group cords by function—charging, audio, video—within your chosen storage so you spot the type you need immediately, not after stressful digging through piles.
Set an alert on your phone for a quick cable review every other month. Little nudges like this help your organizing cables habit stay automatic—which is the true hallmark of a working system.
Never Store Unlabeled Cables
Mark each cable with its length and function the moment you unpack it. Stickers, masking tape, or tiny tags turn an ordinary box into an inventory you can scan at a glance.
- Write short codes like “HDMI-6ft-TV” or “USBC-Laptop1”. This way, future-you always knows what’s what, saving precious minutes.
- Avoid generic names or outdated device labels. Instead, name for current device roles to stop relabeling every time your devices shift.
- Use color-coded ties or tape for cable families (for instance, one color per device type). Color cues cut down both visual clutter and search time.
- If you switch devices frequently, keep a master cable key—a simple reference card—that matches each code to its device, taped inside your cable drawer.
- Toss labels in the trash as soon as they’re not useful. Outdated labels only confuse and add to mental clutter during your organizing cables sessions.
Consistent, readable labels let anyone (not just you) retrieve or return a cable without fuss. Smooth workflows emerge naturally from this micro-effort.
Choosing Smart Tools for Cable Organization
The right organizing cables accessories turn a tangle into a toolkit. If you pick practical tools tailored to your habits, you’ll solve messes for good instead of just hiding them.
Store-bought cable ties, sleeves, and organizers each have a distinct advantage: they make it easier to reset to “neat” after every use. Choose one method per cable type for consistency.
Cable Clips: Desktop Order
Cable clips keep charging cords from sliding to the floor. Snap a weighted clip to your work desk’s edge and thread in your phone, USB, and laptop charger. Each cable stays ready so you don’t reach blindly for them.
Instead of using random household items, purpose-made cable clips offer a solid hold and a visually neat appearance. The result is less visual noise and more practical workspace order, especially in multi-device setups.
Reserve clips just for daily-use cables. Relying on them for infrequent cords leads to forgotten, unused accessories clogging up your desk. Keep the system focused for maximum impact in your organizing cables workflow.
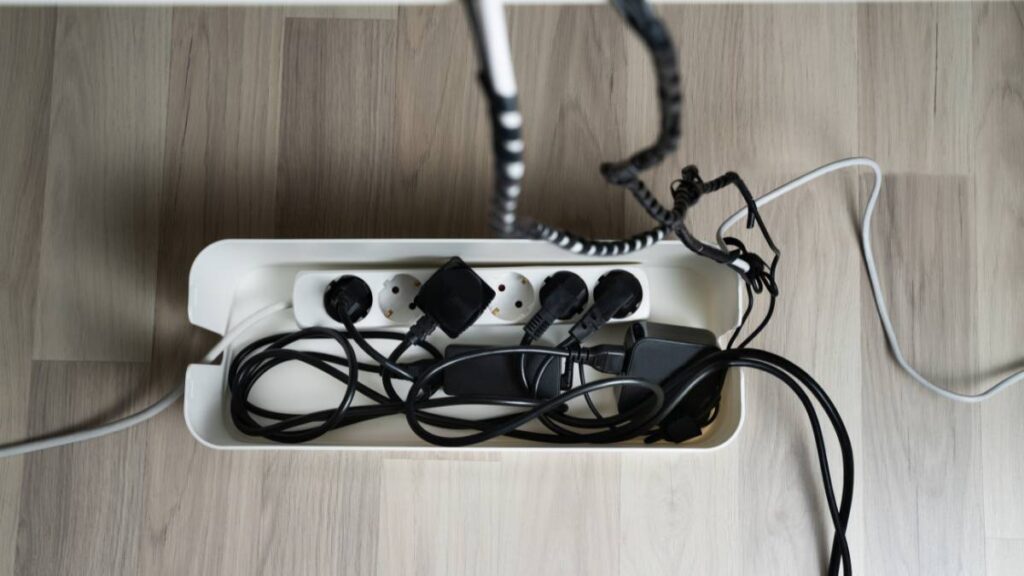
Cable Sleeves: Taming the Power Strip
Cable sleeves group multiple cords into a single, smooth “snake.” Slip the sleeve over the surge protector cables or entertainment unit wires. This instantly transforms a cluttered floor area into a coherent, dust-resistant bundle in seconds.
Choose sleeves with zippers or hook-and-loop closures for easy reconfiguration. A sleeve isn’t just tidy—it keeps cables up off the ground, protecting them from accidental yanks and pet paws. It’s a smart safety move too.
For an affordable DIY version, repurpose an old sock or spiral wrap. This trick adapts to all cord lengths and turns a mess into an organizing cables win with no special gear.
Creating Cable-Friendly Habits for Daily Tidiness
Simple micro-actions are your secret weapon for organizing cables effectively. Make tidying as habitual as charging your phone, with habits that remove friction and maximize follow-through.
Start by practicing the two-touch rule: only handle a cable twice—once to use, once to put away. This small effort pays off by keeping surfaces and storage areas predictably neat each day.
Visual Prompts Aid Effortless Retrieval
Use wall-mounted pegs or adhesive hooks at eye level for fast access to earbuds and chargers. Visual prompts trigger recall in a way drawers cannot, letting you see and act instantly amid a busy morning.
This physical cue nudges you back to your system every time you reach for a cord. Over time, it becomes second nature, like hanging up your keys or bag upon entering your home.
If you’re the type to leave things lying around, visual organization invites quick corrections. It’s easier to reset a tidy system than battle an invisible mess behind closed drawers.
Scripts for Returning Cables to Their Spot
Say to yourself, “Cables go here now,” as you unplug. Rehearsing this script rewires your brain to treat organizing cables as the natural ending of a task, not an extra chore. Say it, then store—repeat until it sticks.
If you share your home, teach your system out loud: “Charger cords always hang by the shelf.” The auditory cue trains others to follow your system, making it more resilient to backsliding.
Every evening, do a two-minute walkthrough to hunt for stray cords. This daily ritual cements new patterns, so you build a calm environment one habit at a time.
Repurposing Everyday Items for Home Cable Organization
Household objects offer clever solutions when organizing cables without extra spending. Everyday items provide structure, separation, or labeling, often in a more customizable or flexible way than store-bought products.
Paper towel tubes, bread clips, binder clips, and empty mint tins each make reliable, if quirky, cable organizers. These DIY methods can be tailored exactly to your space and needs for a cost-effective, personalized system.
Binder Clip Management for Workspaces
Attach large binder clips to the edge of your desk or shelf. Feed charging cables through the arms and let them rest in the jaws. Each cord gets instant separation and stays within arm’s reach—never sliding off or coiling up underneath.
For thicker cords, group several together before clipping. This turns your binder into a makeshift charging station. The trick works wherever loose cables threaten to slip out of sight or easy reach.
If you hate visual clutter, spray-paint binder clips to match your room. That turns function into design, blending organizing cables right into your workspace aesthetic.
Bread Clips as Cute Cable Labels
Keep a stash of plastic bread bag clips near your cable drawer. Each time you unpack a new cord, write its type and device on a clip, then snap it onto one end. Bread clips are durable yet unobtrusive labels.
This micro-lifestyle trick costs nothing and standardizes your labeling. Even better, bread clips stay on during use, which means you’re never left wondering which charger fits which device during a rush.
Let visiting friends or family know your system: “Follow the bread clip names to find the right cable.” These little touches turn organizing cables into a household skill, not just a solo habit.
Integrating Cable Care Into Long-Term Routines
Maintaining an organizing cables system takes less time and thought when folded into seasonal or annual routines. Pair cable maintenance with related chores for automation—spring cleaning, device upgrades, or quarterly desk resets.
Review cables for frayed covers or bent pins during your next deep clean, and retire anything no longer safe or compatible. This keeps your collection functional and prevents last-minute scrambles for a working cable.
Routine Device Upgrades
Whenever you upgrade a phone, laptop, or speaker, immediately review all cables connected to old devices. Create a “donate or recycle” pile. This habit keeps your organizing cables workflow current and matches your actual device needs.
Color-code newly included cables before you ever use them, preventing future confusion. If a new cord replaces an old standard (such as USB-C instead of Micro-USB), phase out earlier cables to prevent legacy clutter creeping back in.
“New device, new system” is your cue every upgrade cycle. Copy this principle to each tech refresh—never fall back into mismatched cords or makeshift cable nests after bringing home something new.
Seasonal Deep-Clean Rituals
Align your cable audit with a spring-cleaning weekend or end-of-year closet overhaul. Sorting cords as part of a defined routine increases follow-through—especially if you tie the habit to a visible calendar reminder or annual family event.
Document what you keep, and why, in a simple note tucked inside your cable drawer or digital list. This makes next season’s decision much easier, as you’ll know what stayed and what got recycled.
Finish each deep clean by winding, labeling, and storing cords precisely. When every cable fits inside your chosen storage zone, you’ve hit organizational equilibrium—your system’s true end state.
Wrapping Up: Cable-Free Spaces as Lifestyle Wins
Zeroing in on micro lifestyle skills like organizing cables means your environment works for you—not against you. Each tweak, label, and habit adds up to a home that supports your energy and focus.
Far from mere housekeeping, taming wires rewires your daily workflow. You’re not just avoiding clutter. You’re freeing up space, time, and even your mind by removing a repeated obstacle from your day.
Test one new step this week—labeling, daily resets, or DIY organizers—and notice what shifts in your routine. Small acts of order multiply, proving that organizing cables truly pays off in every corner of your life.
Frequently Asked Questions
What should I do with cables I no longer use?
Place them in a box marked “outbox” for a month. If you don’t reach for one, recycle or donate it at a local e-waste program. This keeps organizing cables current and decluttered.
Is there a way to keep cables from tangling in my bag?
Yes. Store each cable in a small zip pouch or use twist ties before tossing them in your bag. Routine winding and storage prevent mid-day frustration and save time searching later.
How often should I review and declutter my cable collection?
Set a reminder every one to three months, depending on how many devices you own. Routine audits ensure that only active, functional cords remain, turning organizing cables into a low-effort habit.
Are there quick DIY organizers I can use in a pinch?
Absolutely. Try binder clips for your desktop or bread clips as labels. These household hacks offer customizable, low-cost solutions for keeping cables sorted anywhere in your home.
What is the best way to label cables?
Use clear, specific names tied to devices and cord types. Masking tape, plastic tags, or bread clips each work well. Consistent labeling ensures fast retrieval and makes loaning or sharing cables much easier.